Studio Calico October Reveal: Story Board – Project Life 2016 – vol. 2 Title Page

Hello! Here’s my second project made with the Story Board Documenter kit. This is my favorite project I made this month!

It is the title page for volume 2 of my 2016 Project Life. I love how it turned out!

I used the Story Board Documenter kit and the mega date stamp to add the months.

The chipboard shapes from the kit are such a nice way to add a special touch to the cards! Here I also stamped a phrase from the stamp set included in the kit.

This is my favorite detail of the month. I layered a 3″x4″ card, the square transparencies and the die cut number to make this card. Here’s a look at how else I was planning to use the transparencies:

Such pretty colors!

Here I used a few more of the fun embellishments from the kit – a badge, the gold foil phrases, chipboard stickers, alpha stickers, and another transparency. I used this card to jot down the goals for this year – the “one” is stamped by masking some of the words from the “you have to be odd to be number one” phrase. (I journaled the #2 goal after taking this photo since it’s private :)).

You can check out my other Project Life projects here:
Project Life 2016 – Week 28
Project Life 2016 – week 29 insert
and here are the Christmas Cards.

What’s catching your eye in the Story Board release? I’d love it if you left me a comment. 🙂

Studio Calico October Reveal: Story Board – Project Life 2016 – Week 29 insert

After making 2 12″x12″ pages and a double page spread (24″x12″) with the Story Board Documenter kit, I still had several cards and embellishments left, so I made this double-sided 6″x8″ insert.

The gold foil phrases are great – there are so many that you’re bound to find one that works with your photos!

You can check out my other Project Life projects here:
Project Life 2016 – Week 28
Project Life 2016 – vol. 2 Title Page
and here are the Christmas Cards.

Studio Calico October Reveal: Story Board

Hello hello! Happy October! I am happy to be contributing to the Creative Team this month with some cards and Project Life spreads! I also made an unboxing video of the Story Board Documenter kit, the 4″x6″ Christmas Card stamp and the 4″x6″ Christmas paper pad, I will post this at 3PM EST today when the kits go for purchase for everyone. 🙂
Here’s my first project made with the Story Board Documenter kit. I loved the colors of this kit, and the embellishments were very fun to use!

I make 2-page weekly spreads for my Project Life, and end up with 2 albums per year. Usually I split the two volumes after 26 weeks, but this year I put two extra weeks in the first volume because I had some trips I didn’t want to split. And I made a single page for the last week of the album – week 28.

I used some phrases from the stamp set either on a journaling card or stamped directly on a photo.

I loved using the chipboard shapes and gold alpha stickers from the kit.

I used the die cut numbers as a stencil to write out my week number on the title card.

The bird transparency is adorable!

You can check out my other Project Life projects here:
Project Life 2016 – vol. 2 Title Page
Project Life 2016 – week 29 insert
and here are the Christmas Cards.

I also have a 2-page Project Life spread that is exclusive to the Documenter workshop, so if you are signed up for that you’ll see it there, along with some tips on how to stretch your kits. Here’s a sneak of the spread:

Have a great October!

Studio Calico October Reveal: Story Board – Christmas Cards

I was so happy to make some cards using the new 4″x6″ Christmas Card stamp set by In a Creative Bubble! Seriously, if you want to make all your Christmas cards with just one stamp, this is the one! It is so versatile – I haven’t even used all the stamps in the set, yet I easily made four cards that have all different looks. So fun!
I’ll be posting an unboxing video at 3:00 PM EST where you can have a look at the 4″x6″ Christmas Card stamp and the 4″x6″ Christmas paper pad.

Also… Happy WCMD (World Cardmaking Day)!! Check out the challenges at Studio Calico and play along for a chance to win a prize!


This was a fun card to make! There are 5 stars lined up in a row in this stamp set, so with some masking I turned them into a Christmas tree!
This was a tricky one to photograph, but here’s a detail of the shine:

I used metallic silver and red glitter embossing powders.

The background is made entirely by blending Color Theory dye inks!

this one was another really fun card to make. I love the script stamp, and the holly stamp.

I added some red glitter glue (Stickles) to add some pops of colors.

For this card, in addition to the 4″x6″ Christmas Card stamp, I also used a piece of the 4″x6″ Christmas paper pad.

The script stamp is gorgeous! I embossed it in gold.

And here’s a look at how I made the background – that pattern stamp is so versatile!

Finally, I got creative on this last card, and used the branch stamp to spell out 2016. 🙂

The stamp set comes with two solid circles that you can use to stamp in the berries, but instead I decided to use some markers to color up all the outlines.

You can use anything you like – watercolors, brush markers, colored pencils, etc. I used Mildliners markers because I got them recently and had them sitting on my desk. 🙂 I love the colors! They are double sided – they have a highlighter tip as well as a detail tip, which I used here.

I hope you liked my cards! I had a lot of fun making them!
You can check out my Project Life projects here:
Project Life 2016 – Week 28
Project Life 2016 – vol. 2 Title Page
Project Life 2016 – week 29 insert.

Preview the Studio Calico October Kits: Story Board

Hello and happy Thursday! Today is Preview day at Studio Calico (the kits are released on the 1st of October, but we have some sneaks to share today, and subscribers can purchase some of the new products at a discount and have them added to their kit box with no  additional shopping cost).

This month, I received the Story Board Documenter kit, and a Christmas stamp and paper pad. I was inspired to get my projects done right away, and I love how they turned out!

Here is an in-progress shot from when I was putting together a Project Life title card.

There are some cool chipboard shapes and gold alpha stickers included in the Documenter kit.

The colors of the kit are really pretty!

Here is a sneak at a sentiment on the stamp set – it’s a 3″x4″ set.

This has got to be my favorite thing I made this month – I layered a journaling card with some of the transparencies and the die cut numbers in the kit. I am using this in the title page of volume 2 of my Project Life album.

A few of the cards have gold foil details, which I always like. I also love the couple of handwritten cards.

Here I also used the mega date stamp to add the months.

The kit also comes with some phrase strips (gold foil on blue) and two flair badges.
Next, on to the cards I made:

The Christmas stamp set is truly gorgeous!

I tried out a few different designs, and it looks like it will be very easy to get my Christmas cards done this year!

This was a fun card to make – the background is all made with color theory dye inks, blended. Then I embossed on top.

And that’s it for me!
You can view more sneaks of the kits and deals here. See you on the first for the full reveal! I shot an unboxing video too that I will be sharing at that time.

Lettering and Calligraphy

In the past several months I have added one new crafty obsession to my already long list: lettering! I am really enjoying this journey, and while I have been focusing on brush lettering, I have also started to learn nib calligraphy through a class at Studio Calico. Now, the intermediate class is coming out:

CALLIGRAPHY 2

Ready for even more exciting ways to spice up your handwriting? Calligraphy artist Maghon Taylor of All She Wrote Notes is back for another look at how to create your own unique hand-lettered projects! Maghon delves deeper into the art of calligraphy by sharing more advanced techniques for creating your own uppercase alphabet and adding the perfect details to your lettered pieces. Plus, you’ll learn plenty of tips and tricks for using gouache and other supplies to create projects bursting with one-of-a-kind flair!
Note : You’ll be using skills taught in Calligraphy 1 in this class. If you missed out on Calligraphy 1 earlier this year, please check out the Calligraphy Bundle for a chance to enroll in both classes at once. 
Class will begin October 18th, 2016!

If you haven’t taken the first class, you can sign up for the class bundle, and pick up this starter kit. Here’s an example of alphabet I wrote out in that class:

So far I have only used black ink with nib calligraphy, but I cannot wait to try out these media:

Dr. Ph. Martin’s Pen White Windsor & Newton gouache Dr. Ph. Martin’s Iridescent Copper Gold

See you in class! This is one class I won’t miss for sure!

Studio Calico September 2016 Lost River Kits – Unboxing

Hello! This month I am trying something new – I filmed an unboxing video of my September Lost River Documenter kit and Planner kit from Studio Calico.

I was curious about some of the items in the kits, such as the sticky notepad in the Documenter kit and the smartphone pad in the Planner kit, and I thought showing them off in a video was more effective than just the pictures they gave on the website. They’re both really nice!

I recently got set up with a cheap but very handy holder for my phone to film videos, so this may be something I keep coming.

September Kits from Studio Calico – Lost River

Hello and happy September! Today is reveal day for the September kits at Studio Calico (Lost River) and for the 9th month in a row I’ve made some pages using the new digital releases. I paired them up with embellishments from my stash. I was on a roll this month and ended up making 3 hybrid pages last night!

The first one I made is probably my favorite of them all. It’s 8.5″x11″. I printed one of the digital papers on an 8.5″x11″ sheet of matte photo paper, along with a digital stamp that I used for my title (I made it hot pink, because it’s one of my favorite colors ever!).  I had saved that scrap of floral paper from last year (it’s a favorite for sure!!) and then I added embellishments in matching colors. Happy happy!

On this page, I printed the floral frame from this set in blue onto a sheet of patterned paper (cut to 8.5″x12″ to fit into my printer). Then I added some brush lettering in it – this may be my first time using hand lettering on a page, but it won’t be the last for sure! 🙂 Then I added some little envelopes to hide my journaling. The scrapbook kit this month has some little kraft envelopes so I wanted to use something similar from my stash. If you’re curious, the papers and some of the embellishments I used here come from an oldie but goodie – the Antiquary scrapbook kit.
I made this page because I needed the reminder. I’ve been feeling a bit down lately so I resorted to what I do best – scrap therapy!! 🙂

For this last page, I did most of the work on the computer before printing. First, I combined two digital papers – the one with the trees that is my favorite this month!, and the woodgrain one. I also cut out one of the circles from the specialty paper and added it to the background (I was going for a sun effect.. does it look like a sun to you? :)). Then, I cut out one of the lettered sentiments from one of the papers and turned it pink (because.. pink!). Then I also made my title using the Nick alpha. Once my background was ready, I printed it out on an 8.5″x11″ sheet of matte photo paper, added my photo and a couple of embellishments, and I was done.

And that’s that for this month. Happy reveal day! What are you buying, if anything? I’ve got my eyes set on the mini Laina alpha stamp set (here’s the digital version).
I have the original 6″x8″ version (plus the accompanying numbers… I hope they make some for this set too!) and I love it! This 3″x4″ set will be perfect for Project Life/planners!

Classes

This is also going to be a great month for classes!
I cannot wait to dig into the new kit workshops for this month! There’s a workshop for each of the scrapbook, documenter and planner kits, and you don’t have to be a subscriber to take the workshop. This month’s teachers are Geralyn Sy (Documenter), Lisa Truesdell (Scrapbook) and Rachel Lim (Planner) – also starting this month there will be additional projects from the CT in the workshops, I can’t want to check them all out!

Also, the 5th class in the Mini Book Library is open – it’s taught by Karen Baker and it’s about making a 5″x7″ binder album. I cannot recommend the bundle enough though – I love the mini book I made from Lisa Truesdell class on traveler’s notebooks!

MINI BOOK WORKSHOP 2016 

| KAREN BAKER

Celebrate good times! Karen Baker heads up this fifth class in the 2016 Mini Book Library series with inspiring ideas for documenting life’s milestones. Karen uses a premade binder album to create a mini book that allows you to focus all your creativity on the most important part: the story inside. You’ll discover plenty of tips and techniques for filling your album with photos, embellishments, keepsakes, and more that perfectly highlight life’s best moments.
Also, the latest installment in the Day by Day 2016 bundle starts next Monday – Everyday Photography with Marcy Penner.

DAY BY DAY | EVERYDAY

 PHOTOGRAPHY

Get snap happy! Marcy Penner is here to show how to capture more of your everyday story in your photos. Marcy’s tips and tricks will help you unleash your inner photographer and inspire you to get creative with how you document your daily memories. You’ll discover fun and simple ways to set up your shots, edit photos on your phone, and organize them so that you can always find what you need. To wrap up the class, Marcy will share some creative ideas for using your photos in a Documenter spread!

Finally, I am super intrigued by the Cut and Paste class:

CUT and PASTE

Create your own unique work of art with just bits of paper, scissors, and words! In this class, Katie Licht shares her passion for transforming a blank journal page into a masterpiece of colors, layers, and patterns. Katie’s tips and techniques will help you discover how to unlock your creative potential and see how easy it is to use paint, paper, and more to create meaningful art journal layouts!

This class also comes with a free stamp set (while supplies last) so check it out! I can’t wait to get my paints out for this class!

Kill My Studio Calico Kit: March – Homespun

Hello and welcome back for another month of Kill My Studio Calico Kit! This is the 9th installment of this series, and in total I have made a whopping (112) layouts. Yay me!
This month I bought the Studio Calico scrapbook main kit, Homespun ($34.99). I also got the Asia stamp and die.

Notes:  I have to be honest. I did not like the look of the kit, and even in person it didn’t speak to me. Hence, it has been sitting there for the past 5 months. I think the problem was that the side A of the papers didn’t appeal to me, yet once I got myself to use it, I found that the side B was much more to my taste. Once I started using the kit, I got into the groove and, while it’s still probably my least favorite kit ever, I love the pages I made. Also, the silkscreen is really cool, I love it! And the alpha is awesome, there are so many letters!

Kill my Studio Calico kit is a monthly series I started on my blog to hold myself accountable and use up my kits. You can subscribe to the Studio Calico Scrapbook kit here.

Status: killed!
I made 9 layouts (1 12″x12″, 8 9″x12″), for a total of $34.99, or $3.89/page. I supplemented the kit with several embellishments from my stash, since I really need to put a dent in it. I also used some stamps and cardstock for a couple pages. Here’s a roundup of all the pages I made:

And here is what I have left:

Leftovers: the kit is most certainly killed. I have some seasonal items leftover (the wooden “March” and the March transparency, which I likely will use in next year’s Project Life album. I also  still have lots of letters left.

And here’s a roundup of all the projects I made:


And here they are, one by one.

I made this page as soon as I got the kit, and I love it! I only used the silkscreen+paint, alpha stickers, puffy stickers and stamp from the kit. The papers were from my stash, and the flowers are by Wilna Furstenberg. Anyway, I love love love how the page turned out. Alas, after this the kit just sat there, until this week. 🙂 What is really sad is that even though I made this page 5 months ago, I am in the exact same spot at the moment – sigh…
Anyway, the remaining pages were all made this week. I decided to make 9″x12″ layouts for my travel album, and I think this kit was a great fit for these photos. I also used several sketches from the Summer of Sketches class that is going on at Studio Calico (enrollment is closed). I don’t have a particular plan for the album because I already documented this trip in detail in last year’s Project Life album, but since it was the trip of a lifetime and I took hundreds of photos that I love, I have plenty of stories to document in this format.
At first I wasn’t sure how to use the rubber animals in the kit, but then I realized I had the perfect way to use the sheep for this title page in my travel album. 🙂 I also used the Asia craft die and the mega date stamp.
The quilt paper was my least favorite in the kit, but it grew on me a bit; here, I used it for the background and covered it up with the vellum, and also added some foam dots in between to make the background even fainter. I love the end result! Then I piled on the embellishments – all from my stash except for the rubber animals, which I thought worked great on this page about food. 🙂
I love the colors of this page! (the blue embellishments and the “adventure” stamp are from my stash). This wood paper was my favorite this month.
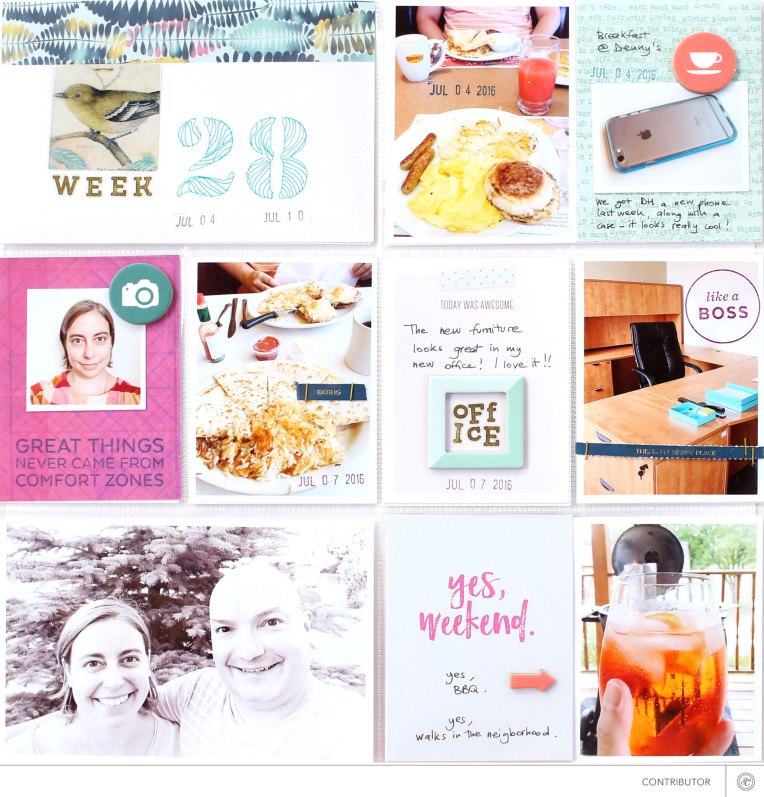
On this page I documented a few of my breakfasts on this trip. I created a grid using some patterned paper and the transparencies that are in the kit. The fabric patch and vellum alpha are from my stash. I also used embellishments from the Finch add on.


I used the silkscreen on a piece of the gray cardstock with two shades of green paint. This screen is very sticky so it tore off some of the cardstock, but I covered it up with the kraft sticker. I added a few embellishments from the Finch add on and from my stash.

I had fun making this page. I used the transparencies to ground my photos.

I love how this page turned out! I used a journaling card (which I punched out and cut up) and some stickers from the Pocket documenter add on.

And here is the last page I made to use up the last few scraps (background cardstock is from my stash). This page didn’t photograph very well, but I love how it turned out. I used some trim from my stash to match the colors in the photos. I used the silkscreen on vellum (which works well because it’s very slick so the screen doesn’t stick too much) with silver paint. Those transparencies from the kit went a long way, I loved using them!

And that’s it for this month! If you have any questions, please leave a comment and let me know!

You can subscribe to the Studio Calico Scrapbook kit here.