One foil sheet, four cards

Well hello, long time no see! But I am alive and well, so I thought I’d pop by and share what I’ve been creating lately. I have been loving hot foil stamping and watercoloring, and I recently made these four cards from one single piece of foil.

{affiliate links used}

I love how they turned out! They all use the Heart Grid hot foil plate from Pinkfresh Studio {scrapbook.com, A Cherry on Top, or scrapbookpal.com}, Aura foil from Spellbinders {scrapbook.com}, and the Spellbinders Glimmer Hot Foil Plate – Mini Everyday Sentiments {scrapbook.com or scrapbookpal.com}. To use up the negative foil, I used the solid hot foil plate from Pinkfresh {scrapbook.com, A Cherry on Top, or scrapbookpal.com}, which is a total game changer. I have the Glimmer Hot Foil System by Spellbinders {scrapbook.com or scrapbookpal.com} and it works great.

The first two cards were made by foiling the Heart Grid and then die cutting a heart out.

For this first card, which is for my Dad’s birthday, I used the Happy Day! stamp {scrapbook.com or scrapbookpal.com} and die {scrapbook.com or scrapbookpal.com} from Colorado Craft Company, which I colored with Daniel Smith watercolors.

The second card uses the Birdbath stamp {scrapbook.com or scrapbookpal.com} and die {scrapbook.com or scrapbookpal.com} from Colorado Craft Company. I colored the scene using Daniel Smith watercolors.

The other two cards were made by salvaging the negative foil and foiling it with the solid plate. The floral bits were cut out from the Floral Harmony die by Pinkfresh Studio.

What techniques have you been enjoying lately? I have been meaning to pull out my alcohol markers next, since I’ve been watercoloring almost exclusively for too long. 🙂

A Page and a Sketch

I am in the middle of moving, which entails packing up my craft room. In doing so, I uncovered several leftover pieces of paper and cardstock, and embellishments. While I was gathering them together to put them away, I noticed they went together well, and this page was born. (Shhhh… I was supposed to be packing but ended up making this instead ;))

I love how this page turned out, and it’s made entirely out of scraps!

Here are a couple details:

I used this to make a sketch to be used in one of the LOAW (Layout A Week) challenges I am hosting at Studio Calico this month.

You can play along here!

New Home Pages

Of course my main scrapbooking topic lately is our new home.. over the long weekend, in addition to cleaning and buying furniture, I dug into the July 2017 kit from Gossamer Blue (that I bought in their closing sale) and made these two pages.

I love the colors and variety of embellishments of the kit! This July kit, along with the ones for the past few months that I also bought :), was designed by Geralyn Sy (In a Creative Bubble).

ETA: yay, this page was chosen for LOTW (Layout of the Week) at Studio Calico!

I added some bronze stars and puffy stickers from my stash. This color scheme is very versatile, it would be great for fall pictures too!

Sakuralala 365: FRIENDS – Cat & Dog

The two latest stamp sets at Sakuralala are cat- and dog-themed, and I find them 100% adorable!
I used the 365: FRIENDS – Cat stamp to embellish this spread in my weekly traveler’s notebook:

With the 365: FRIENDS – Dog stamp, I made a 12″x12″ scrapbook page:

These stamps are just too cute!

Here are some more details.

So fun!

I also shot a process video of this page, you can check it out here:

Have a great rest of the weekend!

Valentine Page and Card

I made this page for the Sketch+ challenge at Freckled Fawn – what better way to use up some of the many washi rolls I own? I love washi!

Sadly the colors didn’t photograph too well – these tapes are so pretty in real life!

I also made a card + gift wrap for Valentine’s Day. The paper is from 14 by Crate Paper – I had never noticed there is a typo repeated several time on the page (“Februrary” and “Februray”!!) so I covered it up with stamped images and phrases.

I love this tall format!

I used a sheet of scrapbook paper as the gift wrap, and added a couple of rectangles of paper to the envelope. So I’m all set for Tuesday!

Coffee Cup Mini Album

Hello! 2017 started pretty well for me and I have been on a roll. I started by cleaning up my craft space (since my desk had been cluttered for months and I had been using my kitchen table to craft… not good!), and then once that was done I jumped into a new project: a coffee cup mini album inspired by the awesome Wilna Furstenberg.

I am just so happy with how it turned out!!

I held on to this cup from Starbucks for many years (it’s my favorite one ever), but finally I decided to use it, and I’m so glad I did! I added some watercolor paint and stitched some embellishments to the front cover.

I was inspired by Wilna’s adorable bear illustrations, so I used a couple of bear stamps I had in my stash from Studio Calico. The one on the cover is from the Waldorf add on (sold out).

On the inside, I used 9″x12″ papers by A Beautiful Mess (the black and white ones) and  papers by  Crate Paper (6″x6″, and 12″x12″ by Maggie Holmes).
This cute polar bear is from an adorable stamp set by Life Love Paper (still in stock if you are interested).

I also used some chipboard by Crate Paper to embellish my pages.

I added a black and white photo of my husband and me from 2016 to each spread.

Here and there, I added some watercoloring. This is the spread at the middle of the album – you can see the stitching I did to bind the pages together.

I love the mix of black and white and hot pink and aqua!

In most cases, I used both sides of the 12″x12″ paper. The 9″x12″ and 6″x6″ papers were one-sided, so I glued them back to back.

And there is the back cover:

When assembling the album, I included a ribbon that can be tied to keep the album closed.

I am so thrilled with how this mini album turned out! What a lovely way to start the year.

Christmas Tags

I started working on my Christmas cards this weekend, in fact I started with Christmas tags and I made over 20! I used an adorable stamp set and coordinating dies by Papertrey Ink called Winter Wishes.

I stamped the animals with black ink, while I used red and green for their clothing. I watercolored the fox and penguin, and then added some sparkle using Stickles. Here’s a look at the details while the glitter glue was still drying out.

Now, on to Christmas cards!

Washi Tape Obsession

Washi tape is one of my latest obsessions. I got many of my favorites from Sakuralala (who by the way is having a 25% off sale through Monday!!), but recently I placed an order from Amazon and I am so giddy with what I got that I just had to share!

Some of these rolls came in a set of 3, but I linked them all here:

The main reason I placed this order was for the MT book washi and the MT skinny tapes, but while I was at it I decided to try these other tapes by Shinzi Katoh that are new to me.
I love using these tapes in my traveler’s notebooks, but I also use them on my scrapbook pages (I will be sharing some examples soon). I just had to have the one that looks like Little Red Riding Hood since it was my favorite fairytale as a child! 🙂

Kill My Studio Calico Kit: December – Lollipop Guild

Hello and welcome back for another month of Kill My Studio Calico Kit! This is the sixth installment of this series, and in total I have made a whopping 83 layouts. Yay me!
This month I only got the Studio Calico scrapbook main kit, Lollipop Guild ($34.99), and then I recently bought the Tin Man embellishment kit $7 at last month’s kit sale.

Notes: I love the colors of this month’s papers! And the embellishments are so much fun – the gold dipped letters, the vellum shapes, the black words and the stamp stickers – I love them all.
The stamp in the embellishment kit is awesome!

Kill my Studio Calico kit is a monthly series I started on my blog to hold myself accountable and use up my kits. You can subscribe to the Studio Calico Scrapbook kit here.

Status: killed!
I made 10 layouts (6 12″x12″,10 8.5″x11″), for a total of $41.99, or $4.2/page. I supplemented the kit with some embellishments from the Project Life kit, plus some items from my stash (stamps, and the odd embellishment). Here’s a roundup of all the pages I made:

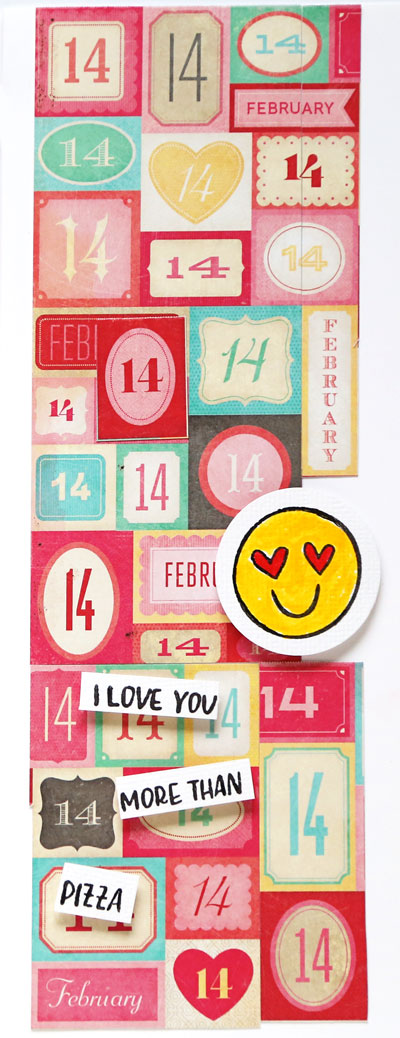
And here is what I have left:

Leftovers: I am pretty sure this is the most I have ever killed a kit! I likely have enough to make one more page using that red paper that was one of my favorites this month. This month I didn’t have to use any card stock from my stash.

And here is what I made with the kit.

This page makes me happy! I used a favorite photo and I just love the juxtaposition of black, red and gold.

The bold papers in this kit are just right up my alley! Here I also added a printable from The Lilypad for the left page, while the right page is all using the Lollipop Guild scrapbook kit and the Tin Man add on. Here’s a look at the right page on its own:

Those stickers were perfect for a page about New York City!
The rest of the pages were done all in one day.. I was on a roll for sure! 🙂

This page was done with the main kit only. I used the vellum, rubber and enamel stars in the kit, and cut some more from patterned paper.

This page is a tribute to my mom, who is the best! This page is done with the scrapbook main kit only, plus some plastic tickets from the Project Life kit.

I tried something different on this page, and I love how it turned out! I used some acrylic paint on the background, and sprinkled some glitter on top. I thought the Tour Eiffel went well with the French theme of the page. The gold “cheers” word comes from the Project Life kit.

Here I used the Maggie alpha for the title (it’s out of stock unfortunately), as well as the stamp set from the Tin Man add on stamped with the silver pigment ink that came with it.

On this page I used some bits left over from the previous month – the background and the red papers.

This is one of my favorite pages with this month’s kit – I just love the colors. It’s not a mix of colors I would have paired on my own, but I absolutely love it! I used the gold alphas from the Canyonlands kit and some puffy gold stars and dots from my stash.

The patterned paper I used for the background is really busy, but I love the look! I used a glassine bag to tone down the area behind the photo. I used some gold letters leftover from the previous month’s kit. Every year we go out after the traditional Messiah concert, and this is what this page is about.

For the last page I put together most of the remaining bits and scraps of paper I had left. Again, not a traditional color scheme for Christmas, but it totally works for me! The colored rubber stars are from the Project Life kit.

And that wraps up this month! Are you enjoying this blog series? Should I keep going? Leave me a comment and let me know!

You can subscribe to the Studio Calico Scrapbook kit here.

Citrus Twist Sketch Challenge

The third project I made as Citrus Twist Guest Designer this month is for the sketch challenge they run on their blog – come play along!

I followed the sketch rather closely.  I used two 3″x4″ photos that had bold colors and patterns, so I decided to pair them with even bolder papers. I cut into one of the papers following the geometric design and used it to mat my photos-I love how these colors and patterns matched one of the shirts I was wearing.  To switch up my title, I cut into the paper with the sketched letters. I added some stickers and wood veneers to embellish the page. This is a fairly busy page, but I feel like the triangles I used for the corners and the additional framing of my photos pull everything together.
Have a nice Sunday!