Lately

I’ve been quiet lately because I have been busy with life, and with playing with new supplies! So here’s what I’ve been up to.

Sweet Stamp Shop

I’ve had a blast making a few projects for Sweet Stamp Shop as a guest designer for October!

The first thing I did after receiving the 3 stamp set was to stamp all the images, color them and cut them out. So fun! The sets on the left are colored with Copics, and the set on the right is done with watercolor pencils.

I’ll be sharing the projects I made with these sets later in the month.

Online Classes

Last year I took Sandy Allnock’s Copic Jumpstart class, and it was great. Since in the past year I’ve acquired an embarrassing amount of colored pencils (I bought both the Prismacolor Premier and Faber-Castell Polychromos full sets, in addition to the 80 Caran D’Ache Supracolor pencils I had from my childhood), I decided to sign up to her Colored Pencil Jumpstart class. I haven’t had time to dive into it yet, since I’m still working on my color charts (and it takes forever with all these pencils! :P), but I am making progress. She just relaunched her Art Classes website with a new platform, and has a great giveaway going on right now- check it out here!

New Art Supplies & Artober

I have been a fan of Jane Davenport for a while, and I am absolutely in love with her products. She has a new line that was launched this month, and I have bought an embarrassing amount of it, and am having a blast trying it all out with her Artober prompts.

So that’s what I’ve been up to. What about you?

Feed Your Craft Sneak Peeks

Finally I can spill the beans… this month, I’m a guest Creative Team member for Feed Your Craft! Here are a couple of sneak peeks of the projects I made using the July kit:


The kit will be available for purchase on the 15th, and I’ll be sharing my projects then too, so hang tight!

Adventures in Coloring: Copic vs Prismacolor

Recently I’ve been exploring some new supplies for coloring. I bought a bunch of Copic markers (see my previous post), and recently over Black Friday I also purchased the full set of Prismacolor pencils (150 colors). I had not planned on getting colored pencils, but the deal was too good to pass. I am so glad I bought them!!

I fell in love with Copics as soon as I tried them – the blending is really easy, and the color looks so smooth! Since I love my Copics so much, I wasn’t expecting to be blown away by the colored pencils, but still wanted to give them a try.

So last night I embarked in a side by side comparison of these two different coloring media. I used them to color the same stamp (by Mama Elephant) in the same color scheme. I started with Copics.

I had some initial trouble of the color bleeding outside the line (I think the issue is that I am still learning, and my markers are very juicy. I was using Copic-friendly paper – Neenah solar white,- so I believe it was user error, rather than a paper issue). Anyway, other than some initial issues the coloring went well. I had some trouble staying inside the lines (I am a bit impatient), but nothing major. Here is a closer look:


The coverage and smoothness of Copic markers just blows me away!

Then I proceeded to color the same image using Prismacolor pencils. I was surprised by how easily this worked too!

I found it much easier to stay inside the lines, but some of the smaller bits were harder to reach than with the marker. I found the blending to work very well here too.

For some reason, I was expecting it would take me much longer to color with pencils than with marker, but that was not the case. (I didn’t time myself because I am still learning so it wouldn’t be a true comparison, but I’d say it took me about the same time with both)

I found that the image colored with pencils has more vivid colors, but some marks due to the nature of pencils; the copic colored image is much smoother.

I am so excited to have these tools available! I haven’t tried using colored pencils on kraft cardstock, but I’ll be experimenting with that soon!

Otterly Awesome Cards

I had fun making a couple of cards using this adorable otter stamp set from Ellen Hutson.

The first one is for the Pin-sights challenge at Ellen Hutson – I was inspired by the blue, purple and browns in the color scheme:

I blended salty ocean and wilted violet distress oxide inks for the background, stamped the otters with Memento Tuxedo Black dye ink, and colored them with Copic Ciao markers.

And the second card is for the Anniversary challenge at Ellen Hutson:

I’m having so much fun experimenting with my markers!

Happy Thanksgiving!


Happy Thanksgiving to all my US friends! I love how this card turned out – colored with Copic Ciao markers. And while I’m at it, I’ll also share a birthday card I made with the cute critters I shared in the previous post.


For the background, I used the forest scene stencil by Hero Arts and some Dylusion ink sprays.

Almost one month to go to Christmas! I am proud of myself because today I finally finished and order the photo calendars I make for our families every year for Christmas. I really dragged it on this year, so now I just need to hope they get here in time. 🙂

My Latest Obsession: Copic Markers

This posts contains affiliate links but all the items were purchased by me – if you use these links, I’ll get a small commission at no additional cost to you. Thanks for supporting my blog!

I am way late on jumping on the train of alcohol markers for coloring. The reason is that way back when I started crafting, I purchased some alcohol inks by Tim Holtz, and given my total lack of skills as I was just starting out, I failed miserably at getting good results with them, and I just got scarred for life and gave up on the alcohol inks. And by association, I never even remotely considered trying alcohol markers. I was just full of misconceptions! But that is all in the past now, and here I am to share what I have learned.

Stamp: Mama Elephant (Whimsical Winter)

Why I love alcohol markers

I can use them on regular cardstock or even directly card bases, and no matter how many times you color over the same spot, the paper won’t pill!! I love coloring with watercolors, which are a forgiving medium and overall I’d say are the cheapest one; yet I dislike that I need to use watercolor paper for them. Here’s a simple and quick card I made directly onto the (cheap) card base (from Michaels):

They blend incredibly well. There are a lot of colors available, and they recommend getting 3 colors in the same family to ensure a good blend. I found them very easy to use! The only tip I have is to start from the lighter color and move towards darker colors, going back to the lighter color to blend.

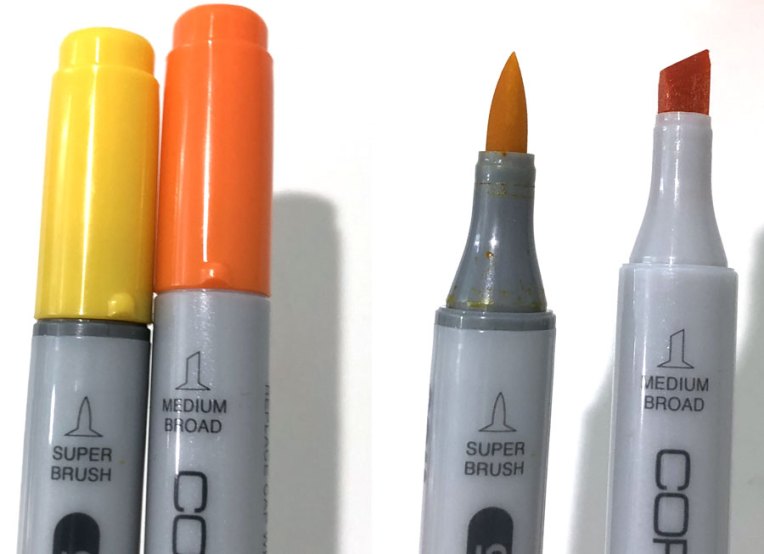
They have a brush tip and a broad tip – the brush tip is flexible (though not as much as a Tombow dual brush pen) and is great for coloring.

What I can live with

Of course nothing is ever perfect, so these markers do have some drawbacks.

Yes, alcohol markers do bleed. Here’s a photo of the back of the same critters. I can live with this – either I can die cut the stamped shapes like I did here, or use a backing on the card. I used Neenah solar white cardstock for these.

They are expensive. There are two main types of Copic markers: the Copic Sketch and the Copic Ciao. The former have a body that is oval in shape and have the widest variety of colors: 358. The Ciao markers cost around 25-30% less than the Sketch, have a round barrel, and come in 180 colors. I decided to go with the Ciao markers because I feel like it’s better to cap my color selection pool to 180 rather than 358 :), and I can get more bang for my buck. The fact that they are round makes them more prone to rolling on the table, but the lids have a ledge that stops the rolling; also I read that the Sketch markers are bigger and I was afraid they would feel too big in my hands.

Since both types of markers are refillable, even though the Ciao can fit less ink, I think the Ciao are cheaper in the short and long run. The only thing I miss is that the lids of the Sketch markers have the color number printed on them, while the Ciao ones don’t.

How I started

They sell sets of these markers, but I decided to purchase individual colors so I can pick and choose the ones I want. Plus there wasn’t really a discount in buying the set. I’m thinking I won’t need all 180 of them – you can see the full range on the Copic website.

I started by purchasing 13 colors plus the colorless blender (which I haven’t quite learned how to use yet, other than as an eraser to fix small mistakes). I chose yellows/oranges and pinks/reds, plus a couple of browns and grays – the goal was to see if I liked them.

Here’s the colors I ordered to start:

Here’s what they look like on copy paper:

And like them I did :), so I went ahead and ordered 21 more – violets, blues and greens.

In the process, I found a new (to me) online store: scrapbookpal.com. I love that it has discounted prices on the entire store (Sketch markers are $5.24 each, and Ciaos are $3.59 each), and shipping for orders above $25 is free! You can’t beat that. Also, the shipping is same day if you order before 2 PM MST. I am blown away by the speedy service: I placed my last order on Friday afternoon, and it had shipped in just half an hour!! They arrived today.

And here’s the swatch:


In short, I find that while I did not NEED these markers in my craft supplies, they are fun and easy to use, and I am glad I tried them out. I love how smooth the color is once it’s laid down! I’m not planning to get all the colors in the collection at this point, but we’ll see how that goes! 🙂

I’m headed on a business trip later this week but as soon as I am back I will be playing with all my new markers! I can’t wait!

Have you tried Copic markers? I’d love to hear what you think!