Hello September

New month, new gallery at write.click.scrapbook. This month’s theme is Back to School.

As I am getting ready to start the second and last year of my degree, it was fun to sit back and look at the pictures I have collected over the past year. I decided to take a picture of me for each week of class, and I love looking back and thinking about all that I have accomplished.

Credits:
Daiy Brads no. 1 and Typeset Alphas No. 3 by Sahlin Studio
The Dirty Dame font by Heather Joyce and Valorie Wibbens

There were a lot of colors in these pictures, so I decided to convert most of them to black and white and only keep a few favorites in color.

It’s kind of daunting to think I have nine more exams to go.. but one at a time, I will tackle them all. Let’s go!

The Best

The August theme for the monthly gallery at write.click.scrapbook was “the best”. I had just the right pictures for this theme: ice cream in Rome! 🙂


I love how this page turned out! I pulled out some supplies from my stash (mainly the Planetarium kit from Studio Calico from May of last year).
I love these gold chipboard stars by Pink Paislee. I had been hoarding these last few, but I was happy to use them on this page.
And now I’m off to make the most of this Sunday before the work week starts! 🙂

Hello July!

Well, we’re a few days into July already (eeeek!), but I wanted to share the page I made for this month’s gallery at write.click.scrapbook, themed “the great outdoors”.

Summer has never been my favorite season, but as the years go by, I appreciate it more and more. I love how this picture I took captures the feeling of summer for me.

Anniversary Week – Day 5

{this is part of a series I wrote for write.click.scrapbook. You can find the full post here}

Welcome to the last day of this Anniversary Week! Today I am sharing some ideas for anniversary gifts.

Some of these projects don’t require photos, and others do, so you can pick the project based off of what you have available.

Let’s start with a photo-less project. Here is a set of personalized coasters I made. I bought the tiles at Lowe’s and covered them up with different digital papers.

Last year my in-laws’ celebrated their 50th anniversary, so I collected a bunch of photos from their family and friends and made a photo collage. We had it printed and framed for them. They loved it!

Next, I want to share two frames I decorated. These make a great gift too. I got the frame from Michaels and it’s very easy to cover up and embellish.

This other frame was from the dollar store, and I covered it up with paper.

Finally, I wanted to share the wall heart-shaped photo display I put together. I prepared photo and paper squares of ~3 inches side and arranged them in a heart shape. I just love how this looks in our living room!

I hope you enjoyed all the anniversary inspiration this week!

Anniversary Week – Day 1

{this is part of a series I wrote for write.click.scrapbook. You can find the full post here}

Hello! Our theme for the week is Anniversaries. I figured this would be a fitting theme for this week, given that write.click.scrapbook’s 5th anniversary is coming up, and it happens to be my wedding anniversary as well. 🙂

Throughout the week we’ll be talking about documenting anniversaries and relationships, how to scrap milestones, anniversary cards, mini albums, and ideas for anniversary gifts.

Documenting Anniversaries

Here are a few tips for your anniversary pages: focus on the photograph, feature the numbers, and tell a story.

Focus on the Photograph

This tip is simple enough: just let the photo speak. Here is my Second Anniversary page.

And here is our Third Anniversary.

Feature the Numbers

I also love to feature the anniversary number on my pages.

Can you spot the number 5 on my Fifth Anniversary page?

The numbers on my Sixth Anniversary page aren’t as subtle. 🙂

Tell A Story

Another tip is to add some journaling about your couple, or about what you did on your anniversary. For my Fourth Anniversary page, I wrote a couple sentences to document how we celebrated it.

Documenting Relationships

All these tips work not just for anniversary pages, but also to document relationships in a broader sense.

A Word About Taking Photos…

As you may have noted, all my anniversary pages feature photographs of my husband and me. But I don’t think I am the only one with a husband who hates being in photos.. am I? So I wanted to share a few tips on how to get those photos taken.

  1. Choose your camera wisely. My husband has a particular aversion to my D-SLR, while he is much more ready to take iPhone pictures. So I pick my battles and only insist on using the big camera when I feel it’s worth it.
  2. Be prepared. Whenever I want a photo with my D-SLR, I know I need to plan in advance, set up the tripod, etc. and have everything ready to snap quickly.
  3. Keep it light. Don’t expect to take 100 shots, one or two good ones will suffice.
  4. Set the mood. The best way to get some good pictures with my husband is to make him laugh. I remember a particularly tough photo session – I had my tripod set up, the cherry trees were in bloom, but he was in a lousy mood. But while I was taking a couple shots of him alone, he started taking a selfie, and I took a photo of him taking a selfie, and that made us laugh. After that, everything went smoothly and I got some great shots (check out my Sixth Anniversary page above for proof).
  5. Share/Motivate. Show him the previous photos you took and how you documented them, and perhaps he will be moved to take new photos. (Sadly, this one doesn’t work at all with my husband..)
  6. Bribe. If your husband is anything like mine, he’ll be open to posing for a few shots in exchange of something he wants – in our case, it’s usually a nice meal ;).

I hope you enjoyed these tips and the inspiration! Tomorrow we will be talking about how to scrap milestones!

Ready for NSD?

Eeeek. It’s May. And National Scrapbooking day is tomorrow!! Do you have crafty plans? I have school meetings in the morning, but after that I plan to get crafty. Yay!

In the meantime, here’s a couple of pages from me. The first is for the write.click.scrapbook May gallery. The theme was “everyday”.

Credits:
Scrap Your Stash Sketch 5, Good Eats word art and Happy Place word art by Digital Design Essentials
Photobooth by Paislee Press
Fonts: American Typewriter, Castro Script, Silverfake

It was my first page with the oh-so-trendy pie chart, and I like how it turned out.

Next up, I had fun with creashens’ new kit! Oh, that pink+yellow combo has me smitten!

Credits:
Keen by creashens
Wet Paint Alpha by CD Muckosky
The Damsel Series fonts by Heather Joyce and Valorie Wibbens

Happy NSD! Make sure to stop by at The Lilypad for all the fun games, and to kiss a certain frog… 😉

April Already?

Hello and happy April! I am so happy to share the page I made for the April write.click.scrapbook gallery.

Credits:
Real Life collection bundle by Digital Design Essentials
Journal Junkie – Bright HeartGood HarvestDoodles-a-Fancy Borders and Blessed Beyond Belief by CD Muckosky
The Golden Friends fonts by Heather Joyce

I just love how it turned out! It also was scrap therapy for me, since I scrapped it at the low point of an awful week. I just love this hobby/creative outlet!

Mini Album with the Citrus Twist March kit

I’m up on the write.click.scrapbook blog today with a mini album project. For the month of March, the team has received kits from different kit clubs and used them to make a mini album. My turn was with the March kit from Citrus Twist, and let me tell you – I had a blast!! I had never used a kit from Citrus Twist before, and when I opened my box I was amazed by the gorgeous combination of product. The colors were right up my alley, and made working on this project an absolute joy!

The wood veneer and stamp for the kit weren’t available yet when they shipped me the kit, so I got a previous add on stamp and some wood veneer arrows instead. The only thing I haven’t used in my album is the black washi tape. In addition to the album featured on the write.click.scrapbook blog, done exclusively with the Citrus Twist kit (plus doily + tags from my stash), I have added some stamping and a couple embellishments in the final version of my album, shown here.

The kit’s pretty colors and embellishments are especially suited for spring, but I had in mind to scrap a winter vacation we did back in 2005, and I thought the kit worked great for it too!

The album is 6″x6″, and I bound it using my Cinch binding machine. One of my favorite things was coloring the letters for the cover. Rather than using the mistable thickers with mists, I painted them with my watercolors.

As you may know, I love color, so I went with a gradation from pink to blue for my title. 🙂

Now, I will walk you through the pages of the album. There are fourteen double spreads, so sit back and relax. 😉

In most pages I used 4″x6″ photos. I did all the journaling using my typewriter. The stamping (mostly sold out stamps from Studio Calico) was done with Hero Arts shadow inks.
  
On this spread I used my mists in several way. To recolor the wood dots and wood veneer arrow, to add some droplets, and to mist the cardstock background on the right. I tucked a tag behind the photo with some hidden journaling.
I also cut out some of the hearts from this pretty Dear Lizzy paper to use as embellishments throughout the album.
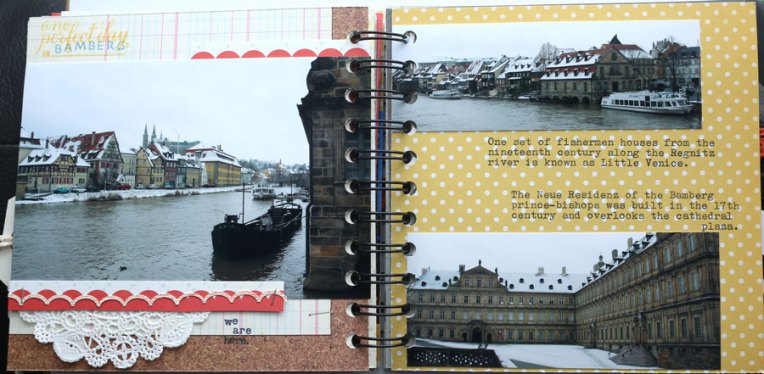
Mostly, I let the photos take the stage. Bamberg is such a magical town!
This paper was so pretty that I ended up using it on both sides of this spread.
The fun ribbon included in the kit was perfect to add texture to this page! I also used a tag for some hidden journaling.
I love the bold statement of this paper by October Afternoon on the left paired with the Crate Paper one on the right- they matched my photo perfectly!
I love the pop of color on the paper I used to mat this photo. The little vellum stickers words from Studio Calico were perfect to add a little something to my pages.
It has been nine years since we took this trip, and we could only remember a couple of the things we did. So I looked for some facts on the internet about the buildings we visited. I am so happy to have this trip documented now!

I loved both sides of the Studio Calico Lemon Lush paper I used to mat my photo on the right, so I decided to fold the corners to show both sides. 🙂 I love the pop of color!

I made a photo collage on the left using templates by Designs by Lili to feature a collection of neat sightings from around town. On the right page, I cut a few strips from the Lemon Lush paper and sewed them down with gold thread.

I love the chipboard cameras in the Studio Calico Essentials line!

It was funny to see how few picture of us we took on this trip. Well, what can I say? Our picture taking habits have certainly improved since I became a scrapbooker. 🙂

And that’s it! Thirty seven pictures and one epic trip documented.


Thank you so much to Citrus Twist for this opportunity!

Getaway

I am so excited to share this page I made for the ScrapOlympics event over at write.click.scrapbook. I love how it turned out!!


I used a Studio Calico kit from Feb. 2013 that I picked up in clearance back in May and hadn’t used. Here are some details:

I love this color scheme, and it was so easy to put together the page! Have a lovely day, and check out the inspiration at write.click.scrapbook. 🙂