September Kits from Studio Calico – Lost River

Hello and happy September! Today is reveal day for the September kits at Studio Calico (Lost River) and for the 9th month in a row I’ve made some pages using the new digital releases. I paired them up with embellishments from my stash. I was on a roll this month and ended up making 3 hybrid pages last night!

The first one I made is probably my favorite of them all. It’s 8.5″x11″. I printed one of the digital papers on an 8.5″x11″ sheet of matte photo paper, along with a digital stamp that I used for my title (I made it hot pink, because it’s one of my favorite colors ever!).  I had saved that scrap of floral paper from last year (it’s a favorite for sure!!) and then I added embellishments in matching colors. Happy happy!

On this page, I printed the floral frame from this set in blue onto a sheet of patterned paper (cut to 8.5″x12″ to fit into my printer). Then I added some brush lettering in it – this may be my first time using hand lettering on a page, but it won’t be the last for sure! 🙂 Then I added some little envelopes to hide my journaling. The scrapbook kit this month has some little kraft envelopes so I wanted to use something similar from my stash. If you’re curious, the papers and some of the embellishments I used here come from an oldie but goodie – the Antiquary scrapbook kit.
I made this page because I needed the reminder. I’ve been feeling a bit down lately so I resorted to what I do best – scrap therapy!! 🙂

For this last page, I did most of the work on the computer before printing. First, I combined two digital papers – the one with the trees that is my favorite this month!, and the woodgrain one. I also cut out one of the circles from the specialty paper and added it to the background (I was going for a sun effect.. does it look like a sun to you? :)). Then, I cut out one of the lettered sentiments from one of the papers and turned it pink (because.. pink!). Then I also made my title using the Nick alpha. Once my background was ready, I printed it out on an 8.5″x11″ sheet of matte photo paper, added my photo and a couple of embellishments, and I was done.

And that’s that for this month. Happy reveal day! What are you buying, if anything? I’ve got my eyes set on the mini Laina alpha stamp set (here’s the digital version).
I have the original 6″x8″ version (plus the accompanying numbers… I hope they make some for this set too!) and I love it! This 3″x4″ set will be perfect for Project Life/planners!

Classes

This is also going to be a great month for classes!
I cannot wait to dig into the new kit workshops for this month! There’s a workshop for each of the scrapbook, documenter and planner kits, and you don’t have to be a subscriber to take the workshop. This month’s teachers are Geralyn Sy (Documenter), Lisa Truesdell (Scrapbook) and Rachel Lim (Planner) – also starting this month there will be additional projects from the CT in the workshops, I can’t want to check them all out!

Also, the 5th class in the Mini Book Library is open – it’s taught by Karen Baker and it’s about making a 5″x7″ binder album. I cannot recommend the bundle enough though – I love the mini book I made from Lisa Truesdell class on traveler’s notebooks!

MINI BOOK WORKSHOP 2016 

| KAREN BAKER

Celebrate good times! Karen Baker heads up this fifth class in the 2016 Mini Book Library series with inspiring ideas for documenting life’s milestones. Karen uses a premade binder album to create a mini book that allows you to focus all your creativity on the most important part: the story inside. You’ll discover plenty of tips and techniques for filling your album with photos, embellishments, keepsakes, and more that perfectly highlight life’s best moments.
Also, the latest installment in the Day by Day 2016 bundle starts next Monday – Everyday Photography with Marcy Penner.

DAY BY DAY | EVERYDAY

 PHOTOGRAPHY

Get snap happy! Marcy Penner is here to show how to capture more of your everyday story in your photos. Marcy’s tips and tricks will help you unleash your inner photographer and inspire you to get creative with how you document your daily memories. You’ll discover fun and simple ways to set up your shots, edit photos on your phone, and organize them so that you can always find what you need. To wrap up the class, Marcy will share some creative ideas for using your photos in a Documenter spread!

Finally, I am super intrigued by the Cut and Paste class:

CUT and PASTE

Create your own unique work of art with just bits of paper, scissors, and words! In this class, Katie Licht shares her passion for transforming a blank journal page into a masterpiece of colors, layers, and patterns. Katie’s tips and techniques will help you discover how to unlock your creative potential and see how easy it is to use paint, paper, and more to create meaningful art journal layouts!

This class also comes with a free stamp set (while supplies last) so check it out! I can’t wait to get my paints out for this class!

Around the World

Sahlin Studio and Britt-ish Designs have put together an awesome Project Mouse: Around the World collection – 11 countries are represented! You can also purchase the countries individually if you want.

Credits:

Project Mouse (World): Italy by Sahlin Studio and Britt-ish Designs

I pulled out some of my travel photos to use with this collection.

Credits:
Project Mouse (World): Italy by Sahlin Studio and Britt-ish Designs
Project Mouse (World): Japan by Sahlin Studio and Britt-ish Designs
Project Mouse (World): Morocco by Sahlin Studio and Britt-ish Designs

Such happy memories!

Credits:

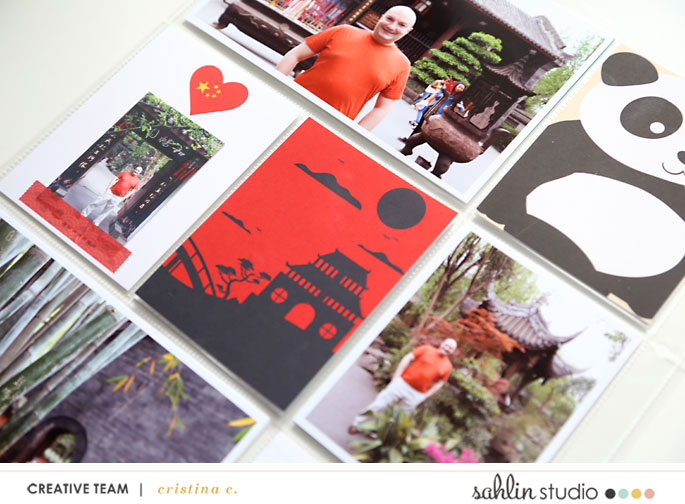
Project Mouse (World): China by Sahlin Studio and Britt-ish Designs

Here are some details:


I added some stamping too using the Asia stamp set.

Have a great weekend!

Weekly Sale at The Lilypad

Hello and happy (almost) Wednesday! I interrupt my non-stop viewing of the Olympics to share a page I made with some products that are 50% off for the SOSN (Something Old, Something New) sale at The Lilypad.

Credits:
Oh So Blessed {Dressed Down} by Fiddle-Dee-Dee Designs


I had so much fun making this page! I used some of the brushes in the kit as masks for the papers, and used them to embellish the background.

Kill My Studio Calico Kit: March – Homespun

Hello and welcome back for another month of Kill My Studio Calico Kit! This is the 9th installment of this series, and in total I have made a whopping (112) layouts. Yay me!
This month I bought the Studio Calico scrapbook main kit, Homespun ($34.99). I also got the Asia stamp and die.

Notes:  I have to be honest. I did not like the look of the kit, and even in person it didn’t speak to me. Hence, it has been sitting there for the past 5 months. I think the problem was that the side A of the papers didn’t appeal to me, yet once I got myself to use it, I found that the side B was much more to my taste. Once I started using the kit, I got into the groove and, while it’s still probably my least favorite kit ever, I love the pages I made. Also, the silkscreen is really cool, I love it! And the alpha is awesome, there are so many letters!

Kill my Studio Calico kit is a monthly series I started on my blog to hold myself accountable and use up my kits. You can subscribe to the Studio Calico Scrapbook kit here.

Status: killed!
I made 9 layouts (1 12″x12″, 8 9″x12″), for a total of $34.99, or $3.89/page. I supplemented the kit with several embellishments from my stash, since I really need to put a dent in it. I also used some stamps and cardstock for a couple pages. Here’s a roundup of all the pages I made:

And here is what I have left:

Leftovers: the kit is most certainly killed. I have some seasonal items leftover (the wooden “March” and the March transparency, which I likely will use in next year’s Project Life album. I also  still have lots of letters left.

And here’s a roundup of all the projects I made:


And here they are, one by one.

I made this page as soon as I got the kit, and I love it! I only used the silkscreen+paint, alpha stickers, puffy stickers and stamp from the kit. The papers were from my stash, and the flowers are by Wilna Furstenberg. Anyway, I love love love how the page turned out. Alas, after this the kit just sat there, until this week. 🙂 What is really sad is that even though I made this page 5 months ago, I am in the exact same spot at the moment – sigh…
Anyway, the remaining pages were all made this week. I decided to make 9″x12″ layouts for my travel album, and I think this kit was a great fit for these photos. I also used several sketches from the Summer of Sketches class that is going on at Studio Calico (enrollment is closed). I don’t have a particular plan for the album because I already documented this trip in detail in last year’s Project Life album, but since it was the trip of a lifetime and I took hundreds of photos that I love, I have plenty of stories to document in this format.
At first I wasn’t sure how to use the rubber animals in the kit, but then I realized I had the perfect way to use the sheep for this title page in my travel album. 🙂 I also used the Asia craft die and the mega date stamp.
The quilt paper was my least favorite in the kit, but it grew on me a bit; here, I used it for the background and covered it up with the vellum, and also added some foam dots in between to make the background even fainter. I love the end result! Then I piled on the embellishments – all from my stash except for the rubber animals, which I thought worked great on this page about food. 🙂
I love the colors of this page! (the blue embellishments and the “adventure” stamp are from my stash). This wood paper was my favorite this month.
On this page I documented a few of my breakfasts on this trip. I created a grid using some patterned paper and the transparencies that are in the kit. The fabric patch and vellum alpha are from my stash. I also used embellishments from the Finch add on.


I used the silkscreen on a piece of the gray cardstock with two shades of green paint. This screen is very sticky so it tore off some of the cardstock, but I covered it up with the kraft sticker. I added a few embellishments from the Finch add on and from my stash.

I had fun making this page. I used the transparencies to ground my photos.

I love how this page turned out! I used a journaling card (which I punched out and cut up) and some stickers from the Pocket documenter add on.

And here is the last page I made to use up the last few scraps (background cardstock is from my stash). This page didn’t photograph very well, but I love how it turned out. I used some trim from my stash to match the colors in the photos. I used the silkscreen on vellum (which works well because it’s very slick so the screen doesn’t stick too much) with silver paint. Those transparencies from the kit went a long way, I loved using them!

And that’s it for this month! If you have any questions, please leave a comment and let me know!

You can subscribe to the Studio Calico Scrapbook kit here.

August Kits at Studio Calico: Young at Heart

Hello and happy August! As has been my tradition since January, I made a couple of hybrid pages using the digital releases from Studio Calico for the Young at Heart August kits. They are both 8.5″x11″. From what I’ve seen of the kits, this is going to be a good month!

To make this page, I used these digital products:

The background was made repeating one of the journal cards from this set, and the hearts are cut out from another of the cards. I recolored the labels to match.

I stamped the title using an old 6×8 alpha stamp called Oliver, and since the colors turned out to be brighter than I expected (I blame it on the matte photo paper, which is awesome for printing, less awesome for stamping), I added some vellum to the bottom of the page to tone it down. I love the result!

To make this page, I used these digital products:

I fell in love with the design and colors of this greeting card by Jasmine Jones, so I used it as my background, combined with one of the 12×12 digital papers and a printable word strip.

I hope you have a great start of the week and month!

Kill My Studio Calico Kit: February – Savannah

Hello and welcome back for another month of Kill My Studio Calico Kit! This is the 8th installment of this series, and in total I have made a whopping (103) layouts. Yay me!
This month I got the Studio Calico scrapbook main kit, Savannah ($34.99 -but I bought it on sale for $17, stamp excluded).

Notes:  at first glance I didn’t love the kit papers as much as other ones, because of the softer colors; my favorite is the floral black and white paper that is on the back of the red gingham one. I love the puffy alpha stickers, the enamel dots, and the stickers.

Kill my Studio Calico kit is a monthly series I started on my blog to hold myself accountable and use up my kits. You can subscribe to the Studio Calico Scrapbook kit here.

Status: killed!
I made 9 layouts (3 12″x12″, 2 8.5″x11″) and a mini book, for a total of $17, or $1.7/page (counting the album as a single page). I supplemented the kit with some embellishments from the Project Life and Planner kits, plus some items from my stash (stamps, washi tape, white cardstock, and the odd embellishment). Here’s a roundup of all the pages I made:

And here is what I have left:


Leftovers: I am hoarding the last piece of the floral paper that I love. 🙂 I didn’t use the pink cardstock – I have a hard time with that color for a background.

And here is what I made with the kit. This month, I used a bit more stuff from my stash than I normally do. Here’s a roundup of all the projects I made:

And here they are, one by one.

On this page, in addition to the kit I used some of the new washi tape I just bought (see more below :)), and some puffy stickers from Crate Paper.

The sewing of the paper ended up being a bit wonky, but I went with it.

This page is to document my latest obsession: washi tapes! These are all tapes I purchased recently from Amazon, and I laid them out to see what they looked like (you can see them here). Since they looked so pretty all together, I decided to make a page about this obsession of mine. 🙂 Here are the links to the washi tapes I bought in case you are interested. 🙂 I also used some more of the puffy stickers by Crate Paper, along with some past stamps from the Project Life kits.

This one is probably my favorite photo ever of my mom and me, and I paired it with my favorite paper from this kit. I also used some embellishments from the Savannah Documenter kit here.

The sticker sheet included in the kit goes a long way! I used it to build a frame for my photo on this page.

I also made a mini book in traveler’s notebook format using the papers from this kit.
See more pages from this album, including a video walk through, here.

The houses are an old stamp (from the Daily Grind add on) – they were just perfect for these photos.

The washi tape is from the Savannah planner kit (love!), the stamps are from the Annette add on, and the embellishments are from the Finch add on.

This is my favorite page made with the Savannah kit. I chose a few snapshots representing a few things we did this month, turned them black&white, and paired them with my favorite paper of this kit. The “making” title came about because I was trying to spell out words with the leftover alpha letters, and this worked. 🙂 The heart stickers are from the Savannah Project Life kit, while the cork embellishments are from my stash.

And that’s it for this month. If you have any questions, please leave a comment and let me know!

You can subscribe to the Studio Calico Scrapbook kit here.

Planner Bootcamp

Have you seen the newest class from Studio Calico? It’s a Planner Bootcamp taught by Marcy Penner!
And…. all Hello Forever planners are heavily discounted this week for Studio Calico’s 9th birthday celebrations!

Planner Bootcamp is bursting with inspiration from Marcy and other contributors, who can’t wait to share how they use their calendars to keep themselves on track. You’ll learn things like:
  • Tips for time management
  • Ideas for dealing with unfinished tasks
  • Tricks for using stamp brushes to make your own stickers
  • How to map out things like chores and meal planning
  • Ideas for using the class stamp set in your planner
  • … And more!
Plus, you’ll have full access to videos, digital files, challenges, and more. Check out the class in the shop to find out everything you need to know!
Students will also receive an exclusive 4” x 6” stamp set* from Hello Forever that will ship for FREE, no matter where you are. You won’t want to miss out! Enroll in Planner Bootcamp today, and let Marcy help you get your planner in shape.

See you in class!

Traveler’s Notebook Documentation – How to Get Started

It’s been a while since I posted about the new form of documentation I have become obsessed with over the past four months. 🙂 Seriously, I am so in love with traveler’s notebooks!
When I was starting out, I searched the internet for suggestions and tips on what supplies to get to get started, but didn’t really find all the information in one place. So now that I’ve been at this form of documentation for over four month, I thought I’d post a recap of my tried and true supplies, so if you’re also looking to get started you’ll see what worked for me.

I use a weekly format for daily documentation, and a monthly format to have all events at a glance (trips, dinners out, doctor’s appointments, birthdays, etc.).

My Favorite Supplies
Notebook Inserts and Cover
I use weekly and monthly inserts by Midori, and a Webster’s Pages notebook cover.

You can fit four notebook inserts in the Webster’s Pages notebook cover. The inserts come either dated or undated. I started in March with the undated weekly memo format, which I used happily for 15 weeks. I called this “horizontal” because the days are in horizontal blocks.

Then, I recently switched to the dated diary weekly insert, which is vertical. (I couldn’t find the 2016 version online at my usual shopping places, so I am linking you up to the undated version instead).

I am only 3 weeks into using the vertical format so I cannot pick a favorite between the horizontal and vertical formats yet… I love the horizontal very much, but I am warming up to the vertical format. Stay posted for a comparison once I’ve used the vertical insert more. 🙂
One thing I did enjoy and I miss in the dated version is stamping the days in the undated insert.

Pens
I mostly use Hi-Tec C pens for journaling (I love the fine tip!), but Le Pen pens also work great, even though they are a bit thicker.

Stamps
Gotta have stamps!! I mostly use stamps by Studio Calico and Sakuralala – I love that they are made especially for planners/traveler’s notebooks so will fit perfectly the small daily boxes. I love using stamps to tell my story!

Ink
I use pigment ink exclusively (I love dye ink in general but it will bleed to the back page). I use either VersaCraft or Color Theory inks. I love that both kinds come in bright colors.

Washi Tape
I love using washi tape as a starting point to pick the color scheme for the spread! In a few short months, I have amassed quite the collection, and I am showing no signs of stopping! 🙂
My favorite places to shop are Amazon (check out my latest buy) and Sakuralala, but I also occasionally shop on Etsy.

Embellishments
I occasionally add stickers to my spreads, almost exclusively from the Studio Calico planner kits. OK, and now here are two examples of my documentation in traveler’s notebooks.

Weekly Documentation

The journaling here was done with a gray Le Pen.
In this weekly memo format I typically journal my daily documentation on the left, and use the right side to add photos and/or general observations about the week. In this particular week we were traveling so I added a lot more photos than I normally do (1-2).
The washi tape and the chipboard embellishment are from the Finch add on. I also used several phrases from the Summer Vacation stamp set, as well as the  Urban Summer stamp. The “hot” and “humid” weather stamps are from the Patch planner add on kit.

Month at-a-glance

I used a  Hi-Tec C pen for the journaling. The “love this life” stamp is from the  from the Finch add on kit, and the “slow down” is from the Annette add on kit. Other stamps used: Urban Summer; Let’s Chill; Summer Vacation.

I hope you’ve enjoyed this post! Are you a traveler’s notebook fan or a newbie? Either way, I’d love to hear from you!