Weekend Pages

Hello! I had a rather productive weekend and, among other things, completed three 12″x12″ paper layouts. All of them use some old Studio Calico kits that I bought on sale. The first two are made with the Front Row scrapbook kit.

The hearts and black arrows are two sides of the same sheet of patterned paper – I had used a piece of it on this page a couple years ago, and now I used up what I had left.

I also used some die cuts from my stash.

The next page also uses the Front Row scrapbook kit, as well as a bunch of die cuts.

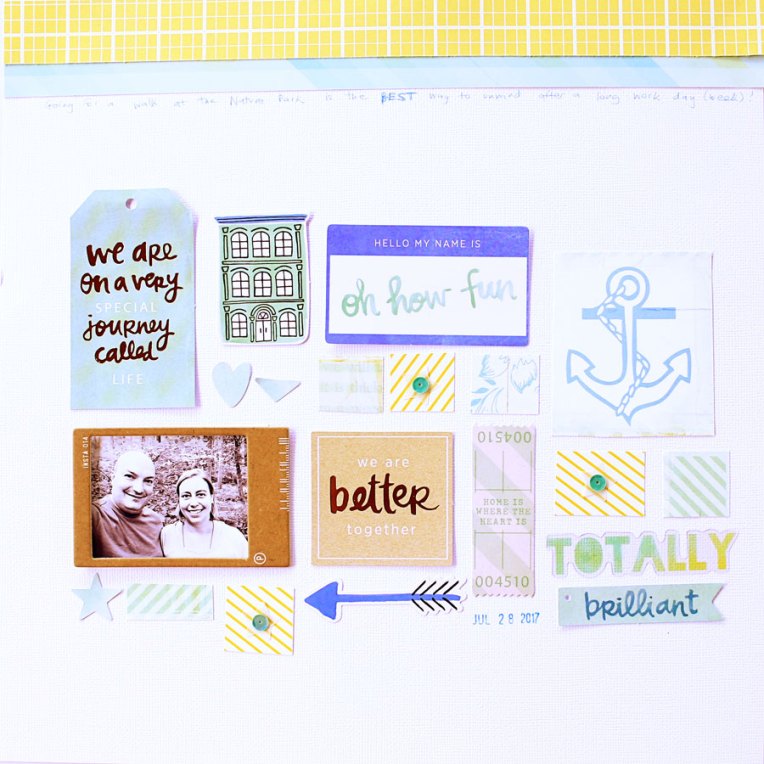
It was so fun to build this collage!

The green/blue/yellow color scheme is so refreshing.

For the last page, I had fun playing with my Distress Oxide inks! For this page, I dug out the Pool Party scrapbook kit from July 2016.

After the mega date stamp… there was the mega wine glass! 😀 Here’s a look at how this page came together.

The colors were inspired by the strips of patterned paper, so I chose some Distress Oxide ink colors to match, and stamped the title with them.

Next, I swiped the ink directly from the ink pad on a piece of clear plastic packaging, misted it with water, and transferred the color onto the alpha cards.

I love this easy and fun way to create a watercolor look with distress inks!

I hope you had a great weekend!

{this post contains affiliate links – if you make a purchase, you’ll support me at no additional cost to you}

Look Ahead – Memory Pockets Monthly: Observations

Hello and happy Friday! This week has been an emotional roller coaster, waiting for important news, and waiting, and waiting… hopefully things will settle down some today. So I was certainly in the mood for some scrap therapy with the latest Memory Pockets Monthly collection, released today at The Lilypad.

Credits:
In Review | August 17 Templates by Sabrina’s Creations
Memory Pockets Monthly: OBSERVATIONS from The Lilypad

I absolutely love these colors – gray, yellow and pink. And those floral patterns from some of the 3″x4″ cards included in the kit are so pretty!

Foxy Fix Coconut (July Special)

Hello! I just received some very happy mail today so I thought I’d share some pictures of my latest purchase with you. For the past couple months, Foxy Fix has offered a couple of monthly special items: single notebook covers, of a couple of different leather types, and available in 2-3 sizes (out of the 9 they offer) at a deep discount. Also, these items ship in only 3-5 business days  (vs 20-30 for their couture items).

If you’d like to get 10% off your first order above $50, use my referral code to sign up for an account (at no additional cost to you).

The July specials are Sugar Coconut and Boss Babe Cambridge leathers, in sizes #2, #3, and #5. The specials this month are stitched and have a pen loop; they also come with secretarial adhesive pockets, a jump band (to fit two additional notebook inserts in the cover), and  a dot-grid notebook insert.

The prices are $30 for the #2 (normally $43 with pen loop and dot-grid insert; stitching is $5 additional), $33 for the #3 (normally $46 with pen loop and dot-grid insert; stitching is $5 additional), and $40 for the #5 (normally $54 with pen loop and dot-grid insert; stitching is $5 additional) – so it’s really a nice deal. As such, they have been very popular so they are currently out of stock, but they said they would restock them once more before July is over (likely this week). And then there will be new leathers and sizes for next month’s special!

I chose a #3 (A6 size) Sugar Coconut. You could add personalization to the front cover, so I chose a gold foiled embossed tree (for $6 additional), since I am currently planning to use this notebook for Christmas. 😉

This notebook came with pink elastics, but I’m planning on changing mine to red if I end up sticking to my Christmas theme. 🙂

Like most orders, they also sent me a free leather sample – I got the Moccasin Sandstone, which is in fact my very favorite leather! You can see all my previous Foxy Fix purchases (including the Moccasin Sandstone) here.

If you’d like to get 10% off your first order above $50, use my referral code to sign up for an account (at no additional cost to you).

July Mixed Media Monthly at The Lilypad

Hello and happy (almost) Friday! Today is release day for the newest M3 (Mixed Media Monthly) collection at The Lilypad, and I loved using it to scrap some of the photos of recent trip I made with my parents! New releases are 20% off through the weekend!

Credits:
Firm Foundations #7 *M3Artsy Bits 12 *M3 and Just My Type #2 *M3 by Lynne-Marie
Some embellishments from Media Monthly July ’17 from The Lilypad

I love how easy it is to build a page using these gorgeous backgrounds!

Credits:
A Slice of Summer Bundle {M3 July 17} by Dawn Inskip
Alpha from Mixed Media Monthly July ’17 from The Lilypad

I had fun on this page combining brushes to build my background.

This next page doesn’t use the M3, but uses another new kit released today:


Credits:
Press Plate No. 42 by Paislee Press for the July ’17 Template Challenge
Seaworthy Kit by Just Jaimee

I also used the M3 for my monthly recap 2-page spread for July:

Credits:
July Month in Review ’17 Template by Scrapping with Liz
Mixed Media Monthly July ’17 from The Lilypad

I am obsessed with that pretty red/pink/green floral paper! So gorgeous!

Hello!

After the death of my previous blog (http://cristinascrap.blogspot.com) when all my hosted images went POOF, I decided to start my own website. I brainstormed a few possible names, and then settled on this one: Paint It Bright. Because I love bright colors – in the clothes I wear  and in the projects I create – and I think having a positive attitude makes things better. Welcome, and please be patient as I work on retrieving the content from my previous blog and setting up this new space.

Traveler’s Notebook 2017 – Week 24

Here’s a look at how I put together a weekly spread in my traveler’s notebook. First, I pick some washi tape from my ever growing collection (this one is by Aimez le Style), and select ink colors that match it (I used Distress Oxide inks for this spread). Then I stamp the dates and the week number, like I did here using the 365: Old English alphabet set.
Next, I select some stamps from the HST – My Motivation and HST – Summer Home sets to decorate my spread.

Finally, I stamp more images from all the Sakuralala stamp sets (365, Hello Small Things, and Years) that coordinate with what happened that week, and write the journaling.

I love this form of documentation, and I love that I can start with a blank canvas each week!

Motivational Card

The Hello Small Things – My Motivation stamp from Sakuralala is so versatile and inspiring! I had fun making this card. I chose three of the circular images and stamped them with matching colors of Distress Oxide ink on white cardstock.

Then I used a 1″ circle punch to cut them out.

I paired the images with three strips of patterned paper, and used a kraft cardstock as my card base. I adhered the stamped images with foam dots to make them pop.

A quick and easy card, done!

Traveler’s Notebook Title Page

I am using the blank weekly memo traveler’s notebook for my daily documentation this year, and since each booklet holds 28 weeks, it was time for me to set up a new notebook. I decided to make a stamped title for both booklets, with the year (2017) and the months contained in each notebook (Jan-July, July-Dec.).
The Hello Small Things – Typeset stamp was perfect for this! The typewriter stamp added an interesting image to the page, and the typewriter alpha stamps fit perfectly in the bookplate at the front of the notebooks. I used Distress Oxide inks for the stamping.

I shot a video with the stamping – you can see how handy the cube acrylic block by Sakuralala is for stamping alphabets, and how I saved some time by stamping in both notebooks at once:

And now I am ready to fill in my notebook with the rest of the year!

Happy Fourth

Happy Independence Day to all my friends in the US! I celebrated doing some stamping in my traveler’s notebook. 🙂

I had so much fun with the new 365: U.S.A. stamp by igloo*dining*! First I stamped the map of the USA, then I laid out all the landmarks around it, and stamped the line to connect the landmark icons to their locations.
 
Finally, I stamped the landmarks all around the USA map. I chose colors inspired by the US flag. This turned out to be the best way to decorate the week of Independence Day (July 4th)!
 
After this stamping was done, I started decorating my spread as I normally do, using other stamps from the 365 collections: and 365: HIKARI and 365: Trip Guru.

All the stamp was done using  Distress Oxide inks. So fun!! 🙂