I made a page using some new printables by Ali Edwards.

The cards come in bold, fun colors and I picked some black and white papers in my stash to go along with them.

I love how this page turned out! I added some journaling inside the pocket too.

I made a page using some new printables by Ali Edwards.
The cards come in bold, fun colors and I picked some black and white papers in my stash to go along with them.
I love how this page turned out! I added some journaling inside the pocket too.

Yeah, I guess I am on a roll with pages welcoming the new year. 🙂 But when I saw these new brushes by Ali Edwards, I couldn’t resist!

I knew I wanted to use one of the brushes in a bold way. So I added a gradient color overlay, and printed it out on white card stock. Then I spent a loooong time stitching around it with four different thread colors. [why do I always underestimate how long it takes to hand stitch something?? LOL.. But it was totally worth it! ;)] I thought about adding some small photos + journaling + embellishments around the word art, but then I decided to make this a 2-page layout instead.

I just added some stamping, a journaling card and a photo on the second page, and scattered a few stars throughout.
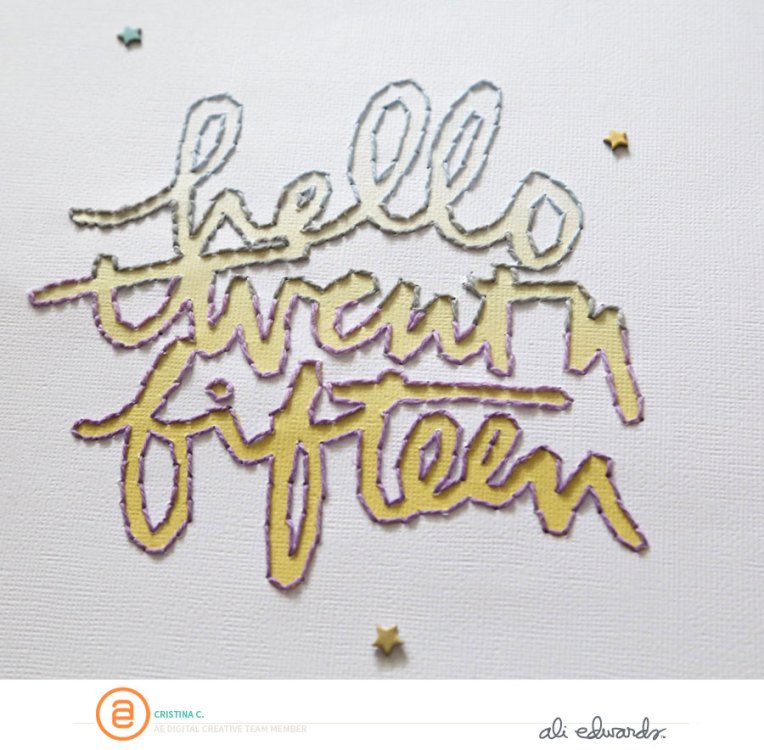
I love how this turned out!

First hybrid/paper page of 2015: done! 🙂
I am hosting a challenge up on the Studio Calico blog today. It was inspired by this card I made with a lovely stamp from the Dec. ’14 Project Life kit.

And if you are interested in starting a subscription, use this link and you’ll get some bonus points (and I will too :)).
As the year comes to a close, I thought it would be fun to look back at 2014. It has been a good crafty/memory keeping year for me.
I took close to 5,000 pictures on my dSLR and ~2,000 on my iPhone – indeed, I love my big camera!!
I made:
Here are just a few of my favorite pages from 2014..


I tried new things: die cutting, letterpressing. I attended my very first crop and met up with some online friends.


Yeah, yeah, I know… only 9 days to Christmas (!!!).. but I just scrapped a Thanksgiving page this weekend so I want to share it with you. 🙂


Ah, December… I love this month because of Christmas, but I hate hate hate all the bustle of the end of the year deadlines! This year is especially bad… I have started working on my December Daily in the evenings, but I have only about four days done so far.
So for now all I have to share is the layout I made for the December gallery at write.click.scrapbook.
I am really in love with this page!! Not your traditional Christmas colors, but so festive nonetheless. 🙂
I have a hybrid/paper page to share today, made with a bunch of digital products by Ali Edwards. I love how by using the digital elements I can start my design in Photoshop, so all of the guesswork is taken out of the assembly part.
I created the background using a combination of digital stamps, and printed it out on American Crafts 8.5″x11″ card stock. Then I added my photos, a couple pieces of paper cut to fit one of the diamonds in the background, and some embellishments.
I couldn’t resist painting that word bubble to make it look like a pumpkin! 🙂 I love how this page turned out.
Hello! I am sharing here the post I made yesterday for the write.click.scrapbook blog on letterpress. I just started letter pressing last week, and I am in love! A while back I showed you how to create a faux letterpress look using embossing folders, but today I want to show you how to do real letter pressing.
Here is what you will need:

I was nominated by Jennifer Larson to be part of a scrap blog tour. Thank you so much Jenny!
1. What am I working on right now?
I am working on getting as many pages out of the Studio Calico Poet Society kits as I can. I have a tendency to hoard rather than use, and I am challenging myself to make the most out of this kit before it’s time to go shopping again. 🙂 Here’s what I’ve made so far with it.


2. How long does it take me to create a project?
Digital page – 30-45 minutes, or less (from when I download the kit to when I’ve uploaded my completed page online).
Paper page – ~2 hours.
Project Life spread – several hours. Printing photos seems to take forever! I do it over multiple days/evenings.
3. What are my favorite things to create with at the moment?
Die cutting machine and Letterpress
Screenprinting has been super fun lately too.

4. How does my writing/creating process work?
I usually start either from a new product I want to use, or a photo I want to scrap. I get easily distracted, so I don’t like to spend hours on end on a project. 🙂
5. How do I become inspired and stay inspired?
It’s usually from the photographs I take. I get excited and want to scrap them right away. 🙂 I love my DSLR camera – I have a Canon 6D and I love it. Along with my 28 mm, 50 mm, 24-105 mm zoom and 55-300 mm zoom lenses.
6. What is my signature style?
I would say my projects tend to be on the simple side, not over-embellished, but I definitely love COLOR and STAMPING.
I nominate Lisa Truesdell, Nirupama Kumar and Celine Navarro. To my knowledge these ladies have not been on the blog tour before so I hope they’ll take part in it now!
ETA: Here’s Celine’s post!

