This posts contains affiliate links but all the items were purchased by me – if you use these links, I’ll get a small commission at no additional cost to you. Thanks for supporting my blog!
I am way late on jumping on the train of alcohol markers for coloring. The reason is that way back when I started crafting, I purchased some alcohol inks by Tim Holtz, and given my total lack of skills as I was just starting out, I failed miserably at getting good results with them, and I just got scarred for life and gave up on the alcohol inks. And by association, I never even remotely considered trying alcohol markers. I was just full of misconceptions! But that is all in the past now, and here I am to share what I have learned.

Stamp: Mama Elephant (Whimsical Winter)
Why I love alcohol markers
I can use them on regular cardstock or even directly card bases, and no matter how many times you color over the same spot, the paper won’t pill!! I love coloring with watercolors, which are a forgiving medium and overall I’d say are the cheapest one; yet I dislike that I need to use watercolor paper for them. Here’s a simple and quick card I made directly onto the (cheap) card base (from Michaels):

They blend incredibly well. There are a lot of colors available, and they recommend getting 3 colors in the same family to ensure a good blend. I found them very easy to use! The only tip I have is to start from the lighter color and move towards darker colors, going back to the lighter color to blend.

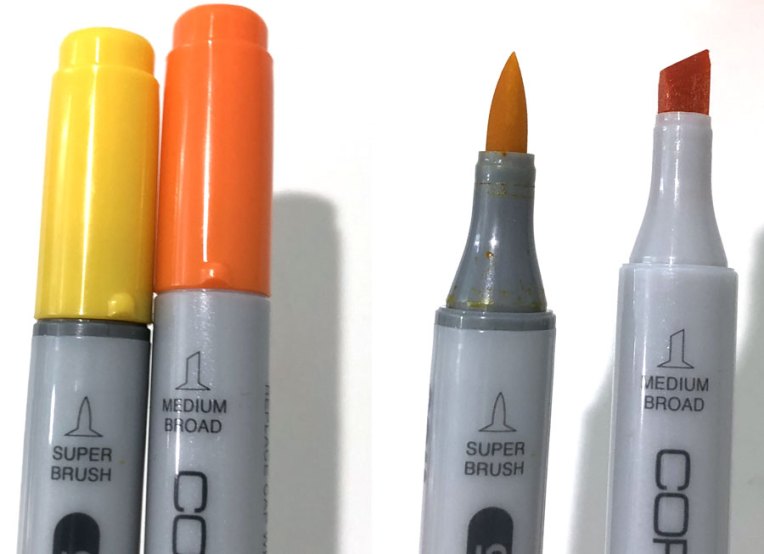
They have a brush tip and a broad tip – the brush tip is flexible (though not as much as a Tombow dual brush pen) and is great for coloring.
What I can live with
Of course nothing is ever perfect, so these markers do have some drawbacks.
Yes, alcohol markers do bleed. Here’s a photo of the back of the same critters. I can live with this – either I can die cut the stamped shapes like I did here, or use a backing on the card. I used Neenah solar white cardstock for these.

They are expensive. There are two main types of Copic markers: the Copic Sketch and the Copic Ciao. The former have a body that is oval in shape and have the widest variety of colors: 358. The Ciao markers cost around 25-30% less than the Sketch, have a round barrel, and come in 180 colors. I decided to go with the Ciao markers because I feel like it’s better to cap my color selection pool to 180 rather than 358 :), and I can get more bang for my buck. The fact that they are round makes them more prone to rolling on the table, but the lids have a ledge that stops the rolling; also I read that the Sketch markers are bigger and I was afraid they would feel too big in my hands.
Since both types of markers are refillable, even though the Ciao can fit less ink, I think the Ciao are cheaper in the short and long run. The only thing I miss is that the lids of the Sketch markers have the color number printed on them, while the Ciao ones don’t.
How I started
They sell sets of these markers, but I decided to purchase individual colors so I can pick and choose the ones I want. Plus there wasn’t really a discount in buying the set. I’m thinking I won’t need all 180 of them – you can see the full range on the Copic website.
I started by purchasing 13 colors plus the colorless blender (which I haven’t quite learned how to use yet, other than as an eraser to fix small mistakes). I chose yellows/oranges and pinks/reds, plus a couple of browns and grays – the goal was to see if I liked them.

Here’s the colors I ordered to start:
- 0 – Colorless Blender
- C0 – Cool Gray
- C3 – Cool Gray
- E31 – Brick Beige
- E57 – Light Walnut
- R20 – Blush
- R22 – Light Prawn
- R29 – Lipstick
- RV06 – Cerise — my favorite, and it blends quite well with the R29
- Y06 – Yellow
- Y15 – Cadmium Yellow
- YR15 – Pumpkin Yellow
- YR68 – Orange
Here’s what they look like on copy paper:

And like them I did :), so I went ahead and ordered 21 more – violets, blues and greens.
- R35 – Coral
- RV02 – Sugared Almond Pink
- RV23 – Pure Pink
- RV29 – Crimson
- V01 – Heath
- V15 – Mallow
- V17 – Amethyst
- Y21 – Buttercup Yellow
- YG03 – Yellow Green
- YG06 – Yellowish Green
- YG17 – Grass Green
- YG67 – Moss
- G07 – Nile Green
- B02 – Robin’s Egg Blue
- B24 – Sky
- B28 – Royal Blue
- B32 – Pale Blue
- B60 – Pale Blue Gray
- BG10 – Cool Shadow
- BG13 – Mint Green
- BG15 – Aqua
- BG49 – Duck Blue
- E59 – Walnut
In the process, I found a new (to me) online store: scrapbookpal.com. I love that it has discounted prices on the entire store (Sketch markers are $5.24 each, and Ciaos are $3.59 each), and shipping for orders above $25 is free! You can’t beat that. Also, the shipping is same day if you order before 2 PM MST. I am blown away by the speedy service: I placed my last order on Friday afternoon, and it had shipped in just half an hour!! They arrived today.

And here’s the swatch:

In short, I find that while I did not NEED these markers in my craft supplies, they are fun and easy to use, and I am glad I tried them out. I love how smooth the color is once it’s laid down! I’m not planning to get all the colors in the collection at this point, but we’ll see how that goes! 🙂
I’m headed on a business trip later this week but as soon as I am back I will be playing with all my new markers! I can’t wait!

Have you tried Copic markers? I’d love to hear what you think!


